

Introduction
I was recently working on a project which involved modeling data stored in Amazon >> DynamoDB. It was only a single table, so by ‘modeling’, I mean setting indexes that would support the required types of queries. I wanted to highlight the differences between effective querying using indexed tables and the process of simple scanning. In order to do that, I needed DynamoDB to be populated with a considerable amount of data. My initial thought was to write a script/application that populated DynamoDB using AWS SDK. However, there was also the option of preparing the file with data, sending it to S3, and synchronizing the DynamoDB table with it by using the Data Pipeline.
The second option sounds better, doesn’t it? Data Pipeline, of course, works in two directions – in our case, from and to DynamoDB. It may look like a simple backup mechanism, but it’s a very interesting method with plenty of potentials. As a result, I’ve decided to postpone writing about modeling and focus on an article that looks at Data Pipeline, so let’s get started.
Data Preparation
We need a file which contains data in a format accepted by Data Pipeline. One of these is the popular CSV format, so let’s see how it looks:
{"Id":{"s":"daa7ba"},"UserId":{"s":"user_47"},"EventType":{"s":"LOG_OUT"}}
{"Id":{"s":"2f4c1b"},"UserId":{"s":"user_95"},"EventType":{"s":"LOG_IN"}}
“event_id_1","user_47","VISIT_PAGE"
"event_id_2”,"user_95",”LOG_IN"
You may be wondering why it doesn’t look like standard CSV data such as:
“event_id_1","user_47","VISIT_PAGE"
"event_id_2”,"user_95",”LOG_IN"
This kind of CSV assumes some sort of recognizable structure: each row has an id, user identifier, and so on. DynamoDB is a schemaless database and each row may contain a different set of data (apart from the primary key, which is mandatory). And this is why we need to assign a column name to each item. To sum it up, CSV supported by Data Pipeline contains rows separated by a new line and each row contains a single JSON with columns separated by commas. To demonstrate the Data Pipeline method, I have prepared a file containing 1 million rows (175MB) in about 7 seconds on my 4-year-old laptop. Now we need to send this file to S3, but this will take a little bit longer. So, let’s create a bucket with a single directory called initial-batch and upload the file to that directory; this gives us data in a location that is easily accessible to Data Pipeline. Now we’re ready to focus on the more interesting part - the Data Pipeline setup.
Data Pipeline Setup
Let’s stop thinking in terms of AWS. Instead, let’s try to imagine a process that is going to take data from one location and save it to another. What kind of information would be needed as an input for such a process? The bases are simple, all we need are:
- source
- destination
In terms of a general overview, that’s all you have: a start point and an endpoint. What, though, does it look like in AWS?
The actual process of creating a Data Pipeline is well described in official AWS documentation, but, to quickly summarise this, we need to create a pipeline configured to look for data in S3 (source) and send it to DynamoDB (destination). The pipeline, of course, maybe customized, so there is a wide range of parameters that may be involved to guarantee the desired result. Fortunately, most of them have a default value. I’m going to use only two of them which, in our case, are crucial:
- DynamoDB write throughput ratio
- Terminate after
Before we dig a little deeper into those two parameters, let’s see how our Data Pipeline looks:
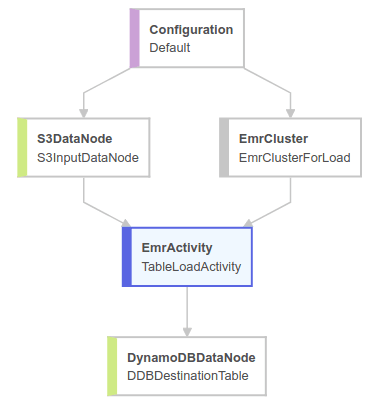
Each module in the diagram has its own set of properties. There is a Configuration module containing information about a whole pipeline, like IAM roles, log locations and so on. The S3DataNode describes the source of the data. The EmrCluster represents a cluster used in migration. The EmrActivity describes the migration process. Finally, the DynamoDBDataNode represents the location where we want to save our data. Now we need to take a look at which modules are affected by the parameters previously allotted to this example:
DynamoDB writes throughput ratio defines which part of provisioned DynamoDB throughput should be involved in the pipeline - it’s a parameter of DynamoDBDataNode. In production systems making backups, it’s crucial that nothing impacts on overall performance, so it has to be carefully calculated in terms of provisioned throughput and expected load. Our goal is to load data from S3 as quickly as possible, so let’s set this property to 1.
Terminate after is a property of Resources Node - in our case EmrCluster. All this does is define a timeout for the pipeline work.
These two parameters depend on each other indirectly. Low DynamoDB write throughput ratio may end up with a timeout error if Terminate after is too small. Moving on, let’s look at an example that uses both of these parameters.
Example
I have uploaded a file containing one million rows of records to S3. Let’s assume we would like the pipeline to be finished within 20 minutes. It’s a simple equation with one unknown which is the number of Write Units saving rows in DynamoDB.
Number of Write Units = number of records * throughput ratio / expected duration in seconds = 1,000,000 * 1.0 / 1200 = 833
Therefore, we need 833 Write Units and two actions need to be taken:
- set DynamoDB table to have 833 Write Capacity Units
- set DynamoDB write throughput ratio, property of DynamoDBDataNode to 1.0
We need to remember that Terminate after is applied to the whole life of EC2 instances used in EmsCluster – don’t forget, startup time also counts. So, let’s add 10 minutes for startup and set Terminate after to 30 minutes. We are now ready to activate Data Pipeline.
After about half an hour we can start to gather some numbers. Let’s see some screens from the AWS console. The first one shows a summary of the Data Pipeline’s execution:

The whole pipeline took about 27 minutes. Let’s see how long it would take to migrate data from S3 to DynamoDB instance.
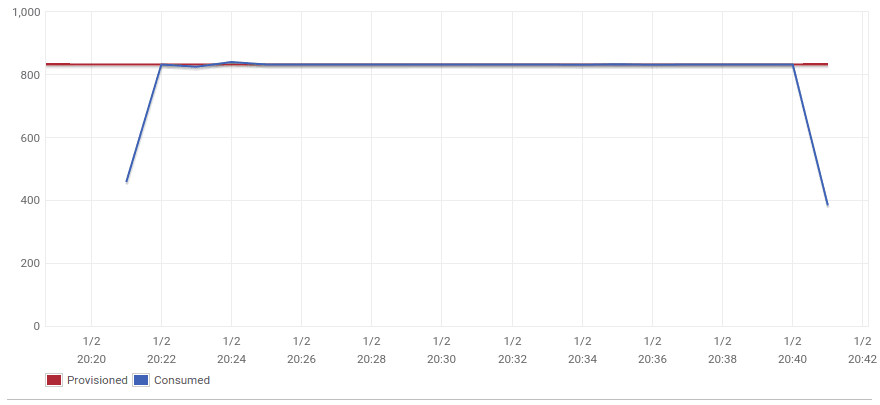
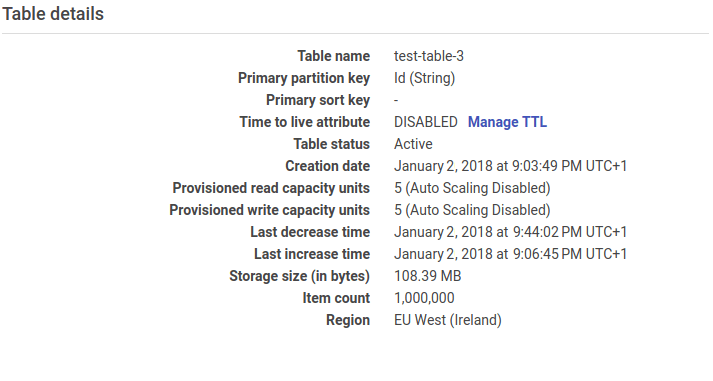
This chart shows the number of Provisioned and Consumed DynamoDB Write Units and demonstrates that the data migration took around 20 minutes as expected. All of the rows are in our DynamoDB instance:
Costs
Each service used in a Data Pipeline is charged separately. In my case it was S3, DynamoDB and EmrCluster. Apart from that we need to pay for Data Pipeline as well, let’s try to sum it up:
- S3: It’s by far the cheapest service. I have uploaded a 170 MB file and, after that, Data Pipeline gets the file for further processing. What’s more it’s free even after the trial period because sending the file to S3 and transferring data inside a single AWS Region is free.
- DynamoDB: This gives us 25GB of storage and 25 Read and Write Units for free ( and it’s not limited to just the first 12 months) so we only need to pay for provisioned Write Units. AWS has estimated the monthly price of using 833 Write Units to be $456.06. As I’ve reduced the number of Write Units after the migration, I only need to pay for the time the migration took. DynamoDB charges an hourly rate so the final cost is about $0.6.
- EmrCluster: We pay a per-second rate for the cluster and underlying EC2 servers, so assuming that the migration process took 30 minutes and we used two m3.large instances, we need to pay about $0.43.
- Data Pipeline: Free Tier offers three activities and three preconditions (I didn’t use it, my activity was launched manually). Without Free Tier, we need to pay $1 a month for High Frequency Activity (executed more than once a day) and $0.6 for Low Frequency Activity (executed once a day or less). We also need to pay for Data Pipeline when it’s inactive, so it’s a good idea to delete activity if you no longer need it. The cost of Data Pipeline is about $0.5 (half month of testing High Frequency Activity).
So, all in all, the whole cost of the migration is $0.6 + $0.43 + $0.5 = $1.53.
Summary
Setting up Data Pipeline between S3 and DynamoDB is a very simple example of how you can use this service. There’s a good chance that it may be able to bring a valuable feature to your application, but even outside of production it’s a fantastic option for an automatic backup. Not only can it aid sending your data for further computing, but it can also initialise your database.